

Storage Settings Reference
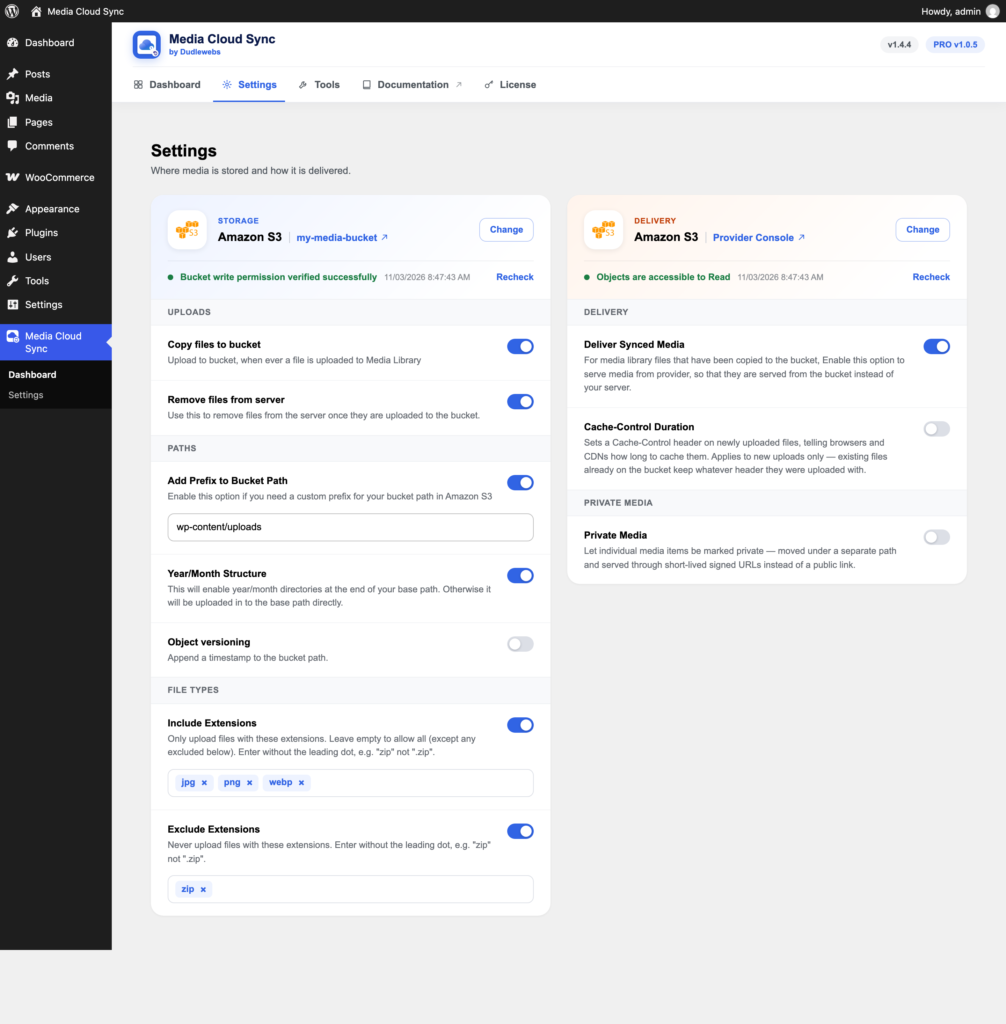
Storage settings control what gets uploaded to your bucket and where it’s stored. Open them from Media Cloud Sync → Settings. They’re in the left-hand Storage column.

The card at the top shows the connected provider and bucket. The bucket name links to your provider’s console. The status line under it shows the last check, and Recheck runs it again. Click Change to run the setup wizard again.
After changing any option, a bar appears at the bottom of the screen with You have unsaved changes. Click Save Changes, or Cancel to undo your edits.
Note: Settings can’t be saved while a bulk job is running (“Sync in progress. Please wait until it completes before saving changes.”). Pause or stop the job first.
Settings at a glance
| Section | Setting | Default | Plan |
|---|---|---|---|
| Uploads | Copy files to bucket | On | Free |
| Uploads | Remove files from server | Off | Free |
| Paths | Add Prefix to Bucket Path | On (wp-content/uploads) | Free |
| Paths | Year/Month Structure | On | Free |
| Paths | Object versioning | Off | Free |
| File types | Include Extensions | Off | PRO |
| File types | Exclude Extensions | Off | PRO |
Copy files to bucket
Uploads every new file added to the Media Library to your bucket, including all generated image sizes (thumbnails, medium, large, and others).
Turn it off to pause offloading new uploads. Media that’s already in the bucket keeps being served from the cloud.
This must be on to use Sync Media to Cloud for existing media.
Remove files from server
Deletes the local copy of a file once it has been uploaded to the bucket, which frees disk space on your server.

Warning: Files are permanently removed from your server. If you later stop using the plugin, you’ll need to bring them back. With Pro, use Restore Media to Server. Otherwise, download them from your bucket and upload them to
wp-content/uploads.
Before turning this on:
- Make sure the status on the Delivery card reports that objects are readable.
- Keep a backup of
wp-content/uploads. - Check that other plugins that need local files (image optimizers, PDF generators, backup tools) are compatible.
This setting applies to files as they’re uploaded. To clear local copies of media that’s already synced, use Remove Media from Server PRO.
Add Prefix to Bucket Path
Sets the folder inside your bucket where files are stored. The default is wp-content/uploads, which mirrors WordPress’s own folder structure.
| Prefix | Resulting object key |
|---|---|
wp-content/uploads | wp-content/uploads/2026/10/photo.jpg |
media/site-a | media/site-a/2026/10/photo.jpg |
| (toggle off) | 2026/10/photo.jpg |
Tip: Use a different prefix per site if several sites share one bucket.
Year/Month Structure
Adds YYYY/MM/ folders after the prefix, using the date folder WordPress gave the file (or the current month if the file has none). With this off, every file goes straight into the prefix folder.
Object versioning
Adds a unique timestamp folder to each file’s path, for example:
wp-content/uploads/2026/10/25143012/photo.jpgEach upload gets a new URL, so browsers and CDNs never show an old cached copy after you replace or edit an image. Turn this on if you use a CDN with long cache times.
The timestamp format is ddHHMMSS when Year/Month is on, or YYYYmmddHHMMSS when it’s off.
Include Extensions PRO
Uploads only files with the listed extensions. Type an extension (without the dot, e.g. jpg) and press Enter to add it. Leave the list empty to allow all types.
Exclude Extensions PRO
Never uploads files with the listed extensions. For example, exclude zip and pdf to keep downloads on your own server.
If an extension appears in both lists, it’s excluded.
Changing the path after media is synced
Changing Prefix, Year/Month Structure, or Object versioning only affects new uploads. Existing files stay where they are in the bucket and keep working.
To move existing files to the new path, use Move Media to New Path PRO.
Copying these settings to another site
Use Import / Export to copy your settings to another site or a staging copy.